Spinnaker deployment pipelines
08 Feb 2016 TweetI’d like to especially thank Tomás Lin and Cameron Fieber for which the below would not be possible without their endless involvement in the #spinnakerteam slack channel.
One of the questions I see come up quite often in slack are how to model deployment pipelines which do not follow
trigger ⇨ bake image with *nix package artifact ⇨ deploy image
Different organizations have their own restrictions or legacy systems which require alternative deployment methods to the above. Because Jenkins jobs are a first class citizen in Spinnaker this gives it the ability to execute complex tasks and pass on any information required from a previous step. I will outline out how to take advantage of this.
One very important concept in pipelines is understanding where and how the Spring Expression Language (SpEL) can be used. A few of these rules are outlined below:
- Spinnaker uses uses the delimiter
${}for SpEL. - Variables can be defined in several ways:
- The first stage of a pipeline allows defining parameters which can be accessed via
${ parameters.key } - The first stage of a pipeline allows parameters to be read from a trigger and accessed via
${ trigger.properties.key } - Read from a Jenkins job artifact that is yaml, json, or Java properties file and accessed via
${ key }
- The first stage of a pipeline allows defining parameters which can be accessed via
Deploy Stagewill create an array called${ deployedServerGroups }which gives enough information to access the deployed cluster.
As of this writing (2016-02-08) the Deploy Stage in Spinnaker “requires” a Bake Stage or Find Image Stage. When I say “requires” I mean that it will display a warning message which can be ignored as it does not prevent the pipeline from executing.

To get around using the Bake Stage or Find Image Stage we’ll have to edit the pipeline json for the Deploy Stage using the key amiName to inject the image id we want to use. While a specific image id might be a show stopper we can dynamically pick the image id through the use of use of the aforementioned SpEL rules and variable access.

{
  "requisiteStageRefIds": [
    "1"
  ],
  "refId": "2",
  "type": "deploy",
  "name": "Deploy",
  "clusters": [
    {
      "application": "some application name",
      "strategy": "redblack",
      "provider": "aws",
      "cloudProvider": "aws",
      ...
      "amiName": "${image_id}", <=== Inject your own image id
      ...
    }
  ]
}
For our own organization we actually have a fairly active rotating AMI id as we make changes to the base AMI used for our applications so it updates often. To keep this rotating AMI id fresh for our 35+ microservices we put this information into a github repo, along with other context for each application to help it deploy properly. Upon bootup we have our applications bootstrap themselves in the simplest way possible.
- Download a JAR file from S3
- Export environment variables for use by the application JAR
- Tag our system
To accomplish this for so many microservices we decided to create a github repo which spits out the configuration for bootstrap in the form of User Data (this is catered towards AWS):
root
 \__applications
   \__service1
     \__production.yaml
     \__staging.yaml
    \__service2
      \__production.yaml
      \__staging.yaml
      \__beta.yaml
 \__scripts
   \__configuration_script.py
   \__ami_table.yaml
This is what configuration_script.py looks like. It takes in an application configuration as shown below.
ami_name: java_ami_hvm
environment: staging
tags:
  role: webapplication
  team: ops

userdata: |
  export CONFIG='staging.yaml'
  export JAVA_OPTS='-Xmx2500m -server -XX:+UseCompressedOops -XX:+UseParNewGC -Dfile.encoding=UTF-8
  export JAVA_HOME='/opt/java8'
  export JAVA_RUN_COMMAND='app.jar'
The resulting transformation after going through our script would be a yaml file like the following to be used as variables in our pipeline.
application_name: 'service1'
environment: 'staging'
base64_userdata: 'ZXhwb3J0IFJFVklTSU9OPXMzOi8vJHtidWNrZXR9L3NlcnZpY2UxLyR7Y29tbWl0aGFzaH0vJHt0aW1lc3RhbXB9CmV4cG9ydCBUQUdTPSd7InJvbGUiOiAid2ViYXBwbGljYXRpb24iLCAidGVhbSI6ICJvcHMiLCAiZW52aXJvbm1lbnQiOiAic3RhZ2luZyIsICJuYW1lIjogInNlcnZpY2UxIicKZXhwb3J0IEFQUExJQ0FUSU9OX05BTUU9c2VydmljZTEKZXhwb3J0IENPTkZJRz0nc3RhZ2luZy55YW1sJwpleHBvcnQgSkFWQV9PUFRTPSctWG14MjUwMG0gLXNlcnZlciAtWFg6K1VzZUNvbXByZXNzZWRPb3BzIC1YWDorVXNlUGFyTmV3R0MgLURmaWxlLmVuY29kaW5nPVVURi04CmV4cG9ydCBKQVZBX0hPTUU9Jy9vcHQvamF2YTgnCmV4cG9ydCBKQVZBX1JVTl9DT01NQU5EPSdhcHAuamFyJwo='
where the transformed base64_userdata in plaintext is
export REVISION=s3://${bucket}/service1/${commithash}/${timestamp}
export TAGS='{"role": "webapplication", "team": "ops", "environment": "staging", "name": "service1"'
export APPLICATION_NAME=service1
export CONFIG=staging.yaml
export JAVA_OPTS='-Xmx2500m -server -XX:+UseCompressedOops -XX:+UseParNewGC -Dfile.encoding=UTF-8'
export JAVA_HOME=/opt/java8
export JAVA_RUN_COMMAND=app.jar
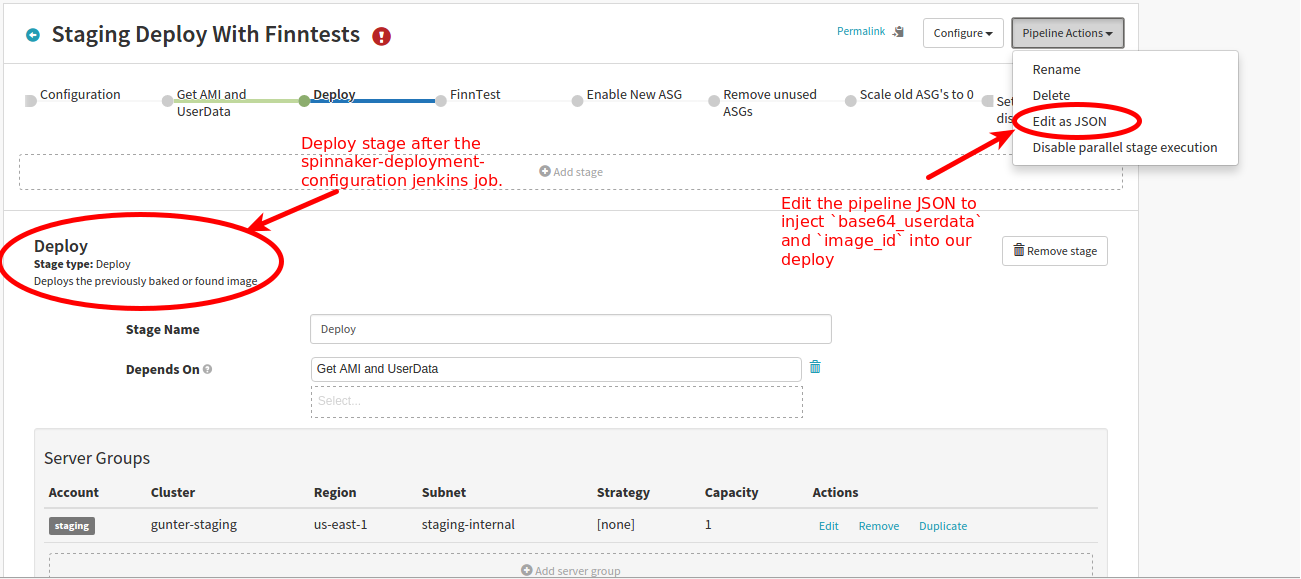
Now what does this look like on the spinnaker side?
And in the Deploy Stage the Advanced Settings of our Server Group

Now our AMI has all the information it needs upon booting up in its autoscaling group to correctly tag itself, download its jar file, add additional motd information, and setup configuration for the application to boot.
If one wanted to execute something on the server group AFTER it has been deployed we can do that as well. A common thing would be integration tests or ansible for most people before enabling the instances in their LoadBalancer. As I mentioned before the Deploy Stage adds information about the deploy to the deployedServerGroups array. If one wanted to attempt to run something against that server group you could access from the following information provided by a deployed server group.
{account=staging,capacity={desired=1, max=1, min=1},
parentStage=23452655c6de4aacb52955e1357dfee7, region=useast1,
ami=ami999af013, storeType=ebs, vmType=pv, serverGroup=service1-049}
Specifically, I created a jenkins job which accepted ${ deployedServerGroups[0].serverGroup } and then accessed the cluster by looking up the tag via aws cli.
Hopefully these are useful tidbits for getting started. Good luck on your pipeline creation!
